Introduction
There are a few things that you will need, but the most important ones are dedication and an idea. Making a skin takes a lot of time and can be frustrating, especially when things don’t work the way you want them to. You will need an image editor that supports transparency and, optionally, an audio editor. The following are recommendations, but any software you choose will probably work.
-
Image Editors
-
Audio Editors
If you go with Paint.NET you should grab some plugins, they add a lot of great options. These are the plugins that I use. It is recommend for you to know how to use your image editor, I won’t be able to show you how to do things in your specific editor, there are just way too many programs. You can search for some tutorials online if you are having trouble with something.
Information and Help
The most important source of information is the skinnable files list. It contains basic information about all known skinnable files. However, not all elements have complete information. Therefore, it’s a good idea to look at other skins, both for inspiration and to figure out how the skinner achieves certain things. Completed skins can be found in the Completed Skins Compendium. osu!’s default skin is also a good starting point, though some newly added elements may be missing.
Other useful information can be found in the important guides and threads post. The Skin Checker can help identify any missing files in the skin’s folder.
For additional help, look around in the main skinning forum, or join the skinship discord server.
Themes and Concepts
You can pick whatever theme you like, just remember to stick to the rules if you plan to post it on the skinning forum. If you don’t have a theme you can just mess around in your image editor until you create something you like or you can try to find some inspiration. You can get inspiration from pretty much anywhere. Some people like to look at other players skins, some take inspiration from art they find online, or even from real life.
Once you have a theme you should consider if it’s a good theme. There are two major points for this. Do you have the needed skill? Are there enough resources if you depend on those? It isn’t a good idea to do something that is far beyond your skill level. Sure, you need to learn new things at some point, but try to learn things that are just a bit over your skill level first, its likely that it will fail otherwise. The second criteria mostly applies to anime skins. It’s quite hard to do a skin about a character if there is barely any artwork of that character, unless you know how to create the required artwork yourself. You could try to use screenshots from the anime the character is from, but that can be a problem as well, especially if the character is just a side character with not much screen time.
Once you have your theme you should think of a concept. Just starting without any plan will probably result in wasted work. Your concept should have the following:
- A rough idea of the colour scheme. For the beginning its enough if you e.g. know dark blue + light blue + pink, exact RGB codes aren’t a must have for the concept;
- A fitting font;
- In what direction do you wanna go? Glowy, minimalistic, realistic? (There are many more options, too many to list.)
- Optional: Background art, a few skinning styles need those;
- Anime skins: Images of the character you want to theme it around (You’re better off searching for renders on the internet if you’re not experienced, but don’t worry, you will learn how to render images yourself later on.)
HD/SD elements, Aspect Ratios and Resolution
There are HD and SD elements. HD elements have the suffix @2x and are exactly double the size of the SD image. If an image is e.g. 128x128 in SD, then it will be 256x256 in HD.

It’s highly recommended to skin in HD, because it will look a lot sharper in game and you can easily convert them to SD. Please note that the skinnable files list only shows both SD and HD sizes! It’s important to note that HD images are only used by osu if it runs with at least 800px height, however, if no HD image is present for a file it will use SD image instead if available.
There is a way to force osu to use HD elements, even if your resolution is below 800px. Open your osu!.PCUSERNAME.cfg (found in the root of your osu! folder) and set HighResolution: 1. This may increase the load on weaker systems, but you can always set this back to 0 if you feel like it affects your performance while playing.
A common mistake is to skin in SD and then upscale the image to HD afterwards. Do not do this. There is no reason to do this, because you won’t increase the image quality by upscaling. You should create the HD elements first and then downscale them to SD. Though, this can become annoying, especially if you have your skin finished and you need to downscale 200+ images, that’s why there are programs that will do the downscaling for you, e.g. Image Scaler by Roan.
Resolution doesn’t really matter for skinning, all it does is determine what elements to use (HD/SD). What really matters for some parts of a skin is the aspect ratio. Some elements need to be adjusted depending on the aspect ratio. It’s recommended to try to support 16:9 and 16:10 in your skin, since those two are the most used ones. Many people are using 4:3, but skinning for this aspect ratio is kind of annoying, which is why I won’t go over it. Just read how to convert 16:9 skins to 16:10 skins and you should be able to do the 4:3 conversion yourself, if you so desire.
Anchor/Origin Points and Layering
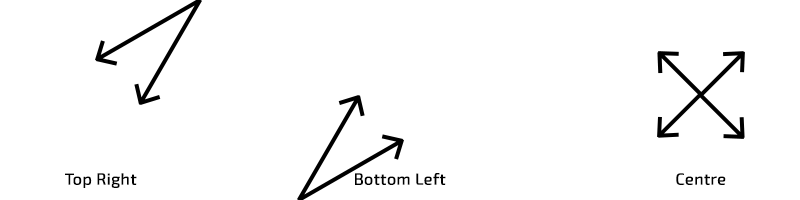
Every element in osu! has an anchor point, which is listed in the skinnable files list. As a consequence of rendering order (the order in which osu! displays images), some elements will appear as if they were above or below other elements. Just remember this, because later on you will need it to understand how some of the gimmicks work. The anchor points that are listed on the spreadsheet will always tell you from where the image will spread, but you also need to consider where an image is placed in the client. The main anchor points being one of the top corners of the file or its centre:
Images that, for example, have their anchor point set as bottom left can’t extend to the left. This means that an element would not be able to reach all places of the screen, unless it’s placed near the left border of the window, as shown below:
Where to start actually skinning?
Now that you know about a few general things and have a theme, it’s time to start working on your skin. Before you do this there is one last thing you should be doing, which is to adjust your ingame settings. This may sound weird at first, but it prevents you from making certain mistakes. You can always change back to your previous settings when you are done skinning. I recommend you adjust the following settings:
- ComboBursts: enabled
- Hit lighting: enabled
- Screenshot format: png
- Show thumbnails: enabled
- Always show key overlay: enabled
- Music/Effect sounds should be somewhat close, using for example 10% for one and 90% for the other may lead to bad sound choices
- Ignore all beatmap skins: enabled
- Use combo colour as tint for slider ball: enabled
After you have done this, you should first work on the skin.ini , after which you can move onto some other section, I would recommend the song selection.
General Tips
Last but not least, a few general tips. Some of these things may seem mundane, but some of you might not know about these.
- Whenever you make changes to your skin, you will need to reload it to see the changes. The skin will be automatically reloaded when restarting, but you can do it manually by going into the skin section in the options and changing your skin, or you could simply use the shortcut
CTRL+ALT+SHIFT+Sto reload your skin. I recommend you make a macro for this if you can. Using the shortcut also reloads the skins list, so if you add a new folder to osu!/skins/ it will be recognized without having to restart the game. - Work with layers, they make your life a lot easier. When I started I didn’t know those existed and it was a pain to create anything. Don’t do the same mistake.
- Always save your project files!
- Different elements have different blend modes and different origin points. These two things will always be listed on the skinnable files list.